
How to Get a Great BBQ Bark

Learn how to get a thick, crunchy BBQ bark on brisket, pork shoulder, and ribs without burning your meat. Master seasoning, airflow, and wrap timing.
For many outdoor cooks, pulling a piece of meat off the smoker with a deep, dark, crunchy bark is the ultimate badge of honor. That rich outer crust provides the perfect contrast to tender, juicy meat inside, packing maximum smoke flavor and rub spices into every single bite.
Achieving a great bark is not just about leaving meat in the smoker for a long time. In fact, leaving meat exposed to heat without the right setup can leave you with a dry, bitter, or burnt crust.
Bark formation is a precise chemical process that relies on the right balance of dry seasonings, rendered fat, surface moisture, and clean airflow. In this guide, we will cover what creates barbecue bark, the key steps to building a thick crust, and four common mistakes that can turn your bark soft or burnt.
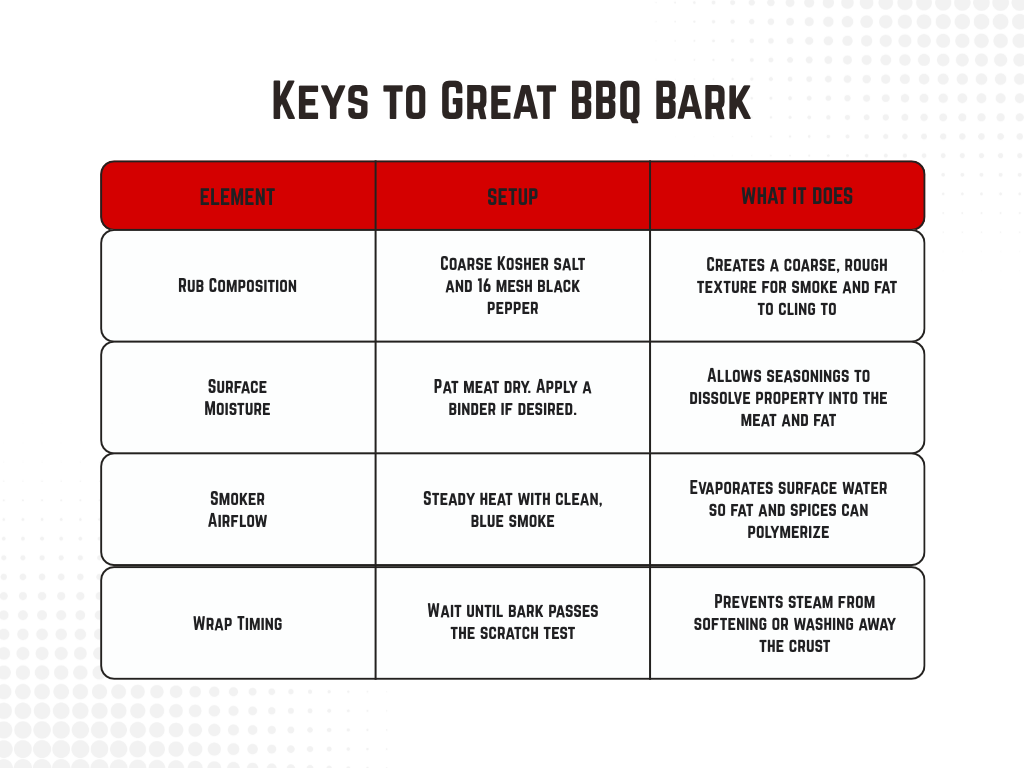
Quick Overview: The 4 Pillars of BBQ Bark
Before jumping into the step by step process, here is a quick breakdown of how each element contributes to building a dark, crunchy crust on your meat.
If your smoker heat drops while trying to establish your fire, check out our diagnostic guide on why your smoker is not getting hot enough.
What Actually Creates Barbecue Bark?
Barbecue bark is the result of two main chemical processes happening simultaneously on the surface of your meat: the Maillard reaction and fat polymerization.
As heat enters the smoker, soluble proteins in the meat rise to the surface and mix with water and dissolved sugars in your rub. At the same time, ambient heat causes fat to render and melt over the exterior.
As surface water evaporates, the rendered fat, dissolved spices, and rendered proteins combine and harden under steady smoke exposure. This process forms a dark, flavorful glaze that thickens into a crunchy crust over the course of several hours. If surface water cannot evaporate, or if fat cannot render properly, your bark will remain soft and pale.
Step 1: Use Coarse Seasonings (16-Mesh Black Pepper)
The size of your seasoning particles plays a massive role in whether your bark turns out thick or mushy.
Why Particle Size Matters
Fine table salt and powdery black pepper dissolve instantly and turn into a smooth paste when mixed with meat moisture. That smooth paste forms a thin barrier that seals off the surface, preventing smoke from penetrating and leaving you with a soft exterior.
The Solution
- Base your rub on coarse kosher salt and 16 mesh coarse ground black pepper.
- Coarse seasonings create a rough, porous texture across the meat surface.
- That rough texture gives rendered fat and smoke particles something physical to latch onto, forming a thick, crunchy matrix as it cooks.
Step 2: Keep the Meat Surface Clean and Dry
Excess surface liquid is the enemy of a crisp bark.
Why Moisture Balance Matters
While you need enough surface moisture to dissolve salt and draw it into the meat, dripping wet meat creates a swampy layer on the exterior. If a thick puddle of water sits on top of your rub, the temperature of the meat surface cannot rise high enough to initiate the Maillard reaction.
The Solution
- Pat the exterior of your meat completely dry with paper towels before applying seasonings.
- If you prefer using a binder to help rub adhere, use a very thin sheen of yellow mustard, hot sauce, or beef tallow.
- Avoid thick layers of liquid binders that cause seasonings to clump into wet paste, or even run off the meat completely.
Step 3: Master Airflow and Hold Off on Spritzing
Bark requires continuous surface evaporation to harden into a crust.
Why Airflow Matters
Air moving through your smoker chamber pulls moisture away from the meat surface. If your cooker has stagnant air or if you open the lid every 15 minutes to spritz, you flood the meat surface with cold liquid, essentially resetting the evaporation process over and over.
The Solution
- Keep your smoker intake and exhaust vents open to maintain active airflow.
- Avoid spritzing the meat during the first two to three hours of the cook.
- Let the dry rub lock onto the rendering fat and set firmly before introducing any spritz liquids.
If you struggle with heavy white smoke during the early hours of your cook, take a look at our guide on how to fix dirty smoke on your smoker.
Step 4: Time Your Wrap Correctly (The Scratch Test)
Wrapping meat too early is the single most common reason pitmasters end up with soft, soggy bark.
How to Perform the Scratch Test
- Before reaching for butcher paper or foil, open your smoker lid and locate a well seasoned area on the meat.
- Gently drag your finger or a butter knife across the bark layer.
- If the seasoning stays locked in place and feels firm, your bark is set and ready for wrapping.
- If the seasoning wipes off on your finger and reveals raw fat or meat underneath, close the lid and continue cooking unwrapped for another hour.
When you do decide to wrap, choose unwaxed pink butcher paper over aluminum foil whenever bark preservation is your priority. Butcher paper allows excess steam to escape while trapping enough heat to push past temperature plateaus. For step by step wrap timing on long cooks, check out our guide on how to stall proof your brisket.
4 Common Mistakes That Ruin Your Bark
- Wrapping Before the Bark Sets: Wrapping in foil or paper before surface fat renders traps steam inside, washing away your seasonings and leaving you with a pale exterior.
- Spritzing Too Frequently: Spritzing every 20 minutes keeps the meat surface cold and wet, delaying the Maillard reaction and preventing the rub from setting.
- Using Fine Sugar Rubs at High Heat: Rubs loaded with white sugar or fine brown sugar burn and turn bitter when exposed to temperatures above 275°F.
- Resting Wrapped Meat Without Venting: Trapping high residual heat inside tight aluminum foil during the rest phase creates intense steam that softens crisp bark. Vent your wrap for 10 minutes to release steam before placing the meat into an insulated cooler to rest.
Frequently Asked Questions
Why is my bark soft after resting in a cooler?
Bark softens in a cooler when trapped steam from hot meat collects inside the wrapping material. To prevent this, open your foil or paper wrap for 10 minutes right after pulling the meat off the smoker to let trapped steam escape, then rewrap loosely before resting.
Does a pellet grill produce as much bark as an offset smoker?
Offset smokers generate higher airflow and direct radiant heat, which naturally forms a thicker bark slightly faster. You can still get incredible bark on a pellet grill by using coarse 16 mesh pepper, keeping smoker temps around 225°F for the first few hours, and using a smoke tube for extra smoke.
Should you use mustard as a binder for barbecue rub?
Binders, in my opinion, are highly overrated. Most meat has no issues holding on to seasoning. I rarely use a binder, and rely on seasoning sticking to the meat with its natural moisture. Some binders containing sugar can help form a better bark with the combination of the right seasoning, but it’s not necessary for a great bark.
Summary & Next Steps
Building a dark, crunchy barbecue bark requires patience and proper technique:
- Use coarse salt and 16 mesh black pepper to build a textured surface layer.
- Allow surface fat to render and form a crust before spritzing with liquid.
- Use the scratch test to verify your bark is set before wrapping in butcher paper.
Once your bark locks in place, you can wrap your meat to lock in juiciness and finish your cook with complete confidence!