
The Ultimate Guide to Wet Brining (And How to Never Serve Dry Meat)
Learn how wet brining works, why it prevents dry meat, and how to wet brine turkey, chicken, and pork chops for maximum juiciness and flavor.
Few things ruin a meal faster than serving lean meat that turned tough and dry during the cook. You spend time picking out a great cut of meat, preparing your smoker or grill, and managing your heat, only to end up with dry poultry or chewy pork chops.
If you struggle to keep lean cuts like chicken breast, turkey, or thick pork chops juicy on the smoker, wet brining is the ultimate technique you need to add to your pitmaster toolbox.
While dry rubs and marinades add flavor to the surface of your meat, a proper wet brine changes the cellular structure of the muscle fibers themselves. That process forces the meat to hold onto moisture even when exposed to high heat or long smoking sessions. In this guide, we will cover how wet brining works, the ideal salt ratios, step by step instructions, and common brining mistakes to avoid.
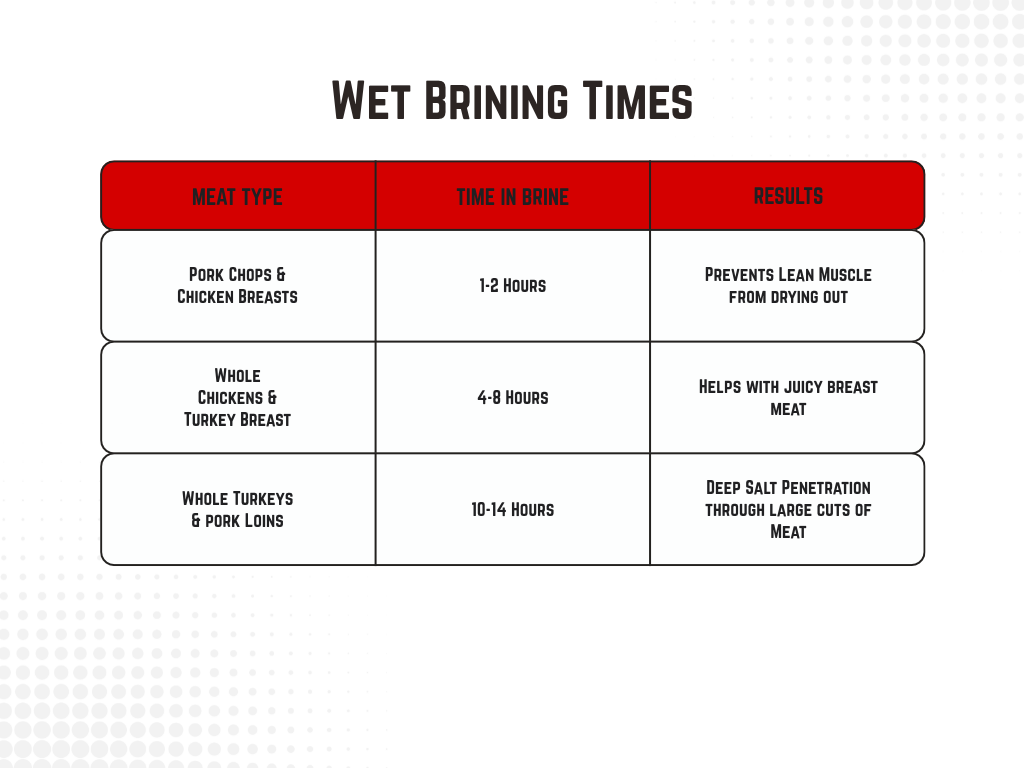
Quick Reference: Wet Brining Times and Ratios
Before diving into the science and steps, here is a quick guide to recommended brining times for common cuts of meat.
If you run into temperature stalls while cooking whole birds or large roasts after brining, take a look at our guide on how to stall proof your brisket.
What Is Wet Brining and How Does It Work?
Wet brining is the process of soaking meat in a salt and water solution before cooking.
When meat sits in a wet brine, two scientific reactions take place: diffusion and protein denaturation. Through diffusion, salt ions in the brine move from the high salt liquid into the lower salt muscle tissue, seasoning the meat deeply rather than just on the surface.
Once inside the meat, those salt ions cause tightly bound muscle proteins to unfold and relax. As those protein strands relax, they create tiny pockets that absorb and lock in water. During cooking, muscle fibers normally contract and squeeze out natural juices. Because a wet brined piece of meat holds extra trapped water and relaxed proteins, it retains up to 10 percent more moisture after cooking compared to unbrined meat.
The Basic Wet Brine Ratio (Equilibrium vs Standard)
Getting the right salt to water ratio is essential. Too little salt will not penetrate the meat, while too much salt will cure the meat and leave it unpleasantly salty.
The Standard Standard Ratio
The classic standard wet brine ratio uses 1 cup of kosher salt per 1 gallon of water. If you measure by weight, aimed for roughly a 5 percent to 6 percent salinity solution.
You can also add brown sugar, herbs, garlic, black peppercorns, or apple cider vinegar to your brine. While aromatics add subtle surface notes, salt and water do the heavy lifting when it comes to moisture retention.
Step by Step Instructions for Wet Brining
Following proper prep and cooling steps ensures your brine seasons the meat safely without compromising texture.
Step 1: Dissolve the Salt and Aromatics
- Bring 1 quart of your total water volume to a simmer in a large pot.
- Add your kosher salt, sugar, and any spices or herbs.
- Stir until the salt and sugar crystals dissolve completely.
Step 2: Cool the Liquid Completely
- Pour the hot concentrated liquid into the remaining 3 quarts of ice cold water.
- Ensure the brine chills below 40°F before adding your meat.
Placing raw meat into a warm brine warms up the meat and creates a food safety hazard.
Step 3: Submerge the Meat
- Place your meat into a large food safe container, brining bag, or stockpot.
- Pour the chilled brine over the meat until it is completely submerged.
- Cover and store in the refrigerator for the recommended time based on the weight of the meat.
Step 4: Rinse and Dry
- Remove the meat from the brine and discard the liquid.
- Rinse the meat briefly under cold tap water to remove excess surface salt.
- Pat the exterior completely dry with paper towels.
If you want crisp skin on poultry, let the rinsed bird sit uncovered in the refrigerator for two to four hours before cooking to let the skin dry out.
Try Our Signature Brine Recipe
If you are looking for a tested, flavor packed brine built specifically for smoking poultry and pork, check out our master brine recipe right here. It features a balanced mix of kosher salt, brown sugar, and spices crafted to keep your meat juicy without overpowering natural wood smoke flavor.
4 Common Wet Brining Mistakes to Avoid
- Brining for Too Long: Leaving meat in a wet brine past the recommended time breaks down muscle tissue excessively, resulting in a mushy, spongy texture.
- Using Table Salt Instead of Kosher Salt: Table salt crystals are much smaller and denser than kosher salt. Using a cup of table salt instead of kosher salt will double the salinity and ruin your meal.
- Submerging Meat in Warm Brine: Always chill your brine completely before adding raw meat to keep internal food temperatures in a safe zone.
- Skipping the Surface Drying Step: Putting wet, drippy poultry straight onto the smoker stops the skin from getting crisp. Always pat the exterior dry before cooking.
If you struggle with dirty white smoke while bringing your smoker up to temp for brined poultry, check out our guide on how to fix dirty smoke on your smoker.
Frequently Asked Questions
Can you use a wet brine on meat that is already injected or enhanced?
A lot of people will say no, but I say YES! Store bought turkey or pork labeled as enhanced, injected, or pre seasoned has already been treated with a salt solution during packaging. People will argue this will make the meat too salty, but I’ve found those most pre-brined or pre-treated meats are generally very lightly salted. I’ve noticed more brands have a drastically watered-down brine, inflating the meat with water weight, so they can sell it for more. The wet brine process will release a lot of that liquid, and salt solution. I’ve found that even pre-treated birds can be wet brined as well. I usually just pull them out of the brine a bit earlier, and make sure to rinse them good so any excess salt residue on the outside rinses away.
Should you rinse meat after wet brining?
Yes. A quick rinse under cold water removes concentrated surface salt so your rub seasonings do not make the exterior overly salty. Just make sure you thoroughly clean, and sanitize everything in at least an 8 foot radius. Rinsing raw meat in the sink can splash unseen bacteria around the kitchen.
Does wet brining make chicken skin rubbery?
Wet brining introduces surface moisture, which can lead to rubbery skin if you do not dry the bird properly before cooking. Air drying the bird uncovered in the fridge after brining ensures the skin crisp up on the smoker. To combat this issue, I smoke the cut for the first half or so of the cook, then crank up the temp to finish. That usually helps crisp up the skin. With turkeys and chickens, I smoke them at 225 F until the internal temp is around 120 F. I then crank up the heat to 375 F until the bird is done cooking. The skin usually turns out great. Exclusively smoking the bird to the end will result in rubbery skin no matter what you do. The skin and fat under the skin need those higher temps to render properly.
Summary & Next Steps
Wet brining is a simple, high reward technique that guarantees juicy results on lean cuts:
- Dissolve kosher salt in water using a 5 percent to 6 percent ratio.
- Always cool your brine completely before adding raw meat.
- Rinse and pat meat dry after brining to protect skin texture and rub flavor.
Check out our complete brine recipe on Yolk & Smoke to prep your next chicken, turkey, or pork cook with complete confidence!