
How to Season a New Pellet Grill or Smoker Step-by-Step

Learn how to season a new pellet grill or smoker step by step. Burn off factory oils, protect your grates from rust, and prep your smoker for its first cook.
Unboxing a brand new pellet grill or smoker is one of the most exciting moments for any outdoor cook. You have the unit assembled, your wood pellets ready, and a shopping list full of meat waiting in the fridge.
Before you throw your first brisket, rack of ribs, or pork shoulder onto those clean grates, there is one critical step you cannot skip. You must burn off and season your new smoker.
Firing up a brand new grill without seasoning it first can ruin your food with bitter chemical fumes, cause meat to stick to bare grates, and leave raw interior metal vulnerable to rust. In this guide, we will cover why seasoning a new smoker is essential, what supplies you need, and a simple four step process to get your new cooker ready for its first real barbecue session.
Quick Overview: The New Smoker Seasoning Process
Before diving into the detailed instructions, here is a quick breakdown of the steps and timeline for seasoning a new smoker.
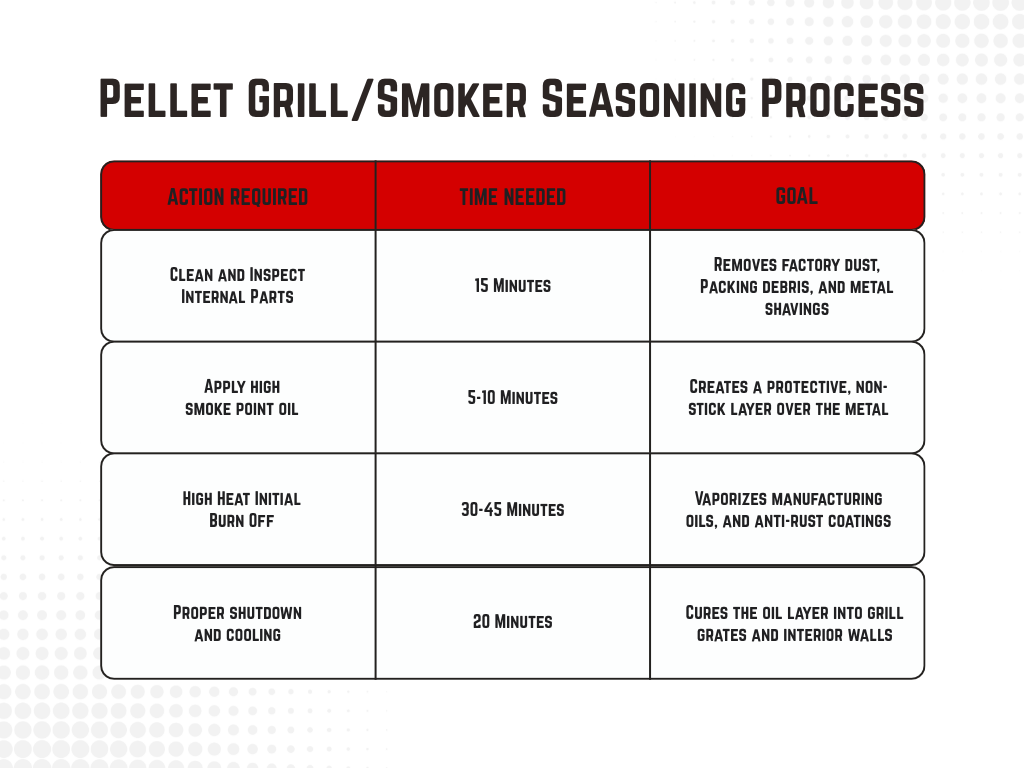
If your smoker heat struggles to reach target temperatures during your initial burn off, check out our diagnostic guide on why your smoker is not getting hot enough.
Why Do You Need to Season a New Smoker?
Seasoning a new smoker accomplishes two major things: cleaning out manufacturing residue and building a protective barrier on raw metal.
During manufacturing, factory equipment coats sheet metal, cooking grates, and internal baffles with anti rust oils, industrial lubricants, and machine solvents to prevent corrosion during shipping. If you put meat directly onto a new, unwashed smoker, those chemical coatings vaporize into your food, creating a metallic, bitter taste and releasing unpleasant odors.
Seasoning also coats raw interior metal with a thin layer of cooked cooking oil. As that oil heats up, it seals raw metal pores, prevents moisture from causing rust, and creates a natural non stick surface on your cooking grates that makes cleanup effortless after future cooks.
Step 1: Wipe Down and Clean Internal Parts
Start by removing any loose industrial residue left behind during shipping and assembly.
How to Do It
- Unbox all internal components, including your cooking grates, grease drip tray, heat baffle, and warming racks.
- Fill a bucket with warm water and a few drops of mild dish soap. This step is completely optional. If you are against using soap for this phase, just use a damp rag, and have an available bucket of clean water that you can rinse the rag in.
- Wipe down all cooking grates, drip pans, and interior metal walls using a soft sponge or microfiber cloth to remove factory dust, metal shavings, and heavy packing oils.
- Rinse every part thoroughly with clean water and dry everything completely with paper towels.
Never use harsh chemical cleaners, oven sprays, or abrasive steel wool inside your smoker chamber, as these can damage internal temperature sensors and leave chemical residue behind.
Step 2: Apply a High Smoke Point Cooking Oil
Once your smoker is clean and dry, apply a protective coating of high heat oil to all internal raw metal surfaces. Some people use duck fat, other use olive, and I’ve even seen avocado. Just make sure it’s food grade oil.
Choosing the Right Oil
Select a oil with a high smoke point that will cure cleanly without turning sticky or going rancid. Good choices include canola oil, peanut oil, grape seed oil, or avocado oil. Avoid using butter, margarine, olive oil, or lard during your initial burn off, as lower smoke point fats burn away too quickly or create a sticky sludge.
How to Apply
- Pour a small amount of high heat cooking oil onto a clean paper towel or shop rag.
- Rub a thin, even coat over all interior metal surfaces, including the inside walls, cooking grates, heat deflector plates, and grease drip pans.
- Keep the oil layer light. You want a thin sheen across the metal rather than pooling liquid or thick drips.
Do not spray cooking oil directly near your pellet igniter rod, temperature probe, or electrical burner elements. This can cause ash, seasoning, and creosote from sticking to them, compromising their function.
Step 3: Run the High Heat Initial Burn Off
Now that your smoker is clean and oiled, it is time to run the high heat burn off to cure the oil and burn away lingering factory vapors.
How to Do It
- Fill your hopper with fresh hardwood pellets or load your firebox with clean charcoal.
- Follow your manufacturer instructions to light the smoker and establish a steady flame in the burn pot.
- Once the fire is burning smoothly, close the lid and set your temperature controller to high, usually between 350°F and 400°F.
- Let the smoker run empty at high heat for 30 to 45 minutes.
During the first 15 minutes, you might see a bit of dark, heavy smoke and smell chemical odors coming from the exhaust chimney. This is completely normal as the heat vaporizes factory anti rust coatings and cures your oil layer.
Step 4: Shut Down Properly and Let the Metal Cure
Finishing your burn off correctly is just as important as the burn off itself, especially for pellet grills.
How to Do It
- Once 45 minutes have passed and the smoke leaving your chimney turns clean and light, initiate the shutdown cycle on your grill controller.
- Allow the shutdown fan to run completely until the unit powers off on its own. This prevents burn back into the pellet hopper and clears out remaining ash in the firepot.
- Leave the smoker lid closed while it cools down. As the internal metal cools slowly, the oil layer polymerizes, turning into a durable, dark, non stick seasoning layer across your grates and walls.
If you notice thick white smoke lingering continuously during later cooks after seasoning, take a look at our troubleshooting guide on how to fix dirty smoke on your smoker.
4 Common Seasoning Mistakes to Avoid
- Cooking Meat During the Initial Burn Off: Never try to cook food during your first burn off session. The chemical fumes released during the first 30 minutes will ruin the flavor of your meat.
- Applying Too Much Oil: Applying a thick coat of oil leads to sticky, gummy residue on your grates rather than a smooth, hard seasoned finish. It could also be a fire hazard.
- Skipping the Initial Wipe Down: Skipping the warm water wash leaves shipping dust and metal shavings underneath your oil layer.
- Using Low Smoke Point Fats: Using butter or cheap vegetable oil spreads causes premature burning, creating acrid smoke that leaves a bitter taste on future cooks.
Frequently Asked Questions
Do you need to season a smoker before every cook?
No. You only need to perform a full high heat burn off and oiling when your smoker is brand new or after you deep clean the interior down to bare metal. Regular cooks naturally add grease and smoke seasoning to the chamber over time.
What happens if you do not season a new pellet grill?
If you skip seasoning, your food can absorb manufacturing oils and anti rust chemicals, resulting in a bitter, metallic flavor. Unseasoned metal grates are also far more likely to rust when exposed to outdoor humidity.
How often should you clean and re season your grates?
Scrape your grates with a wooden scraper or non-bristled grill brush after every cook while the grates are still warm. Check out my wooden grate scrapers here. Apply a quick, light wipe of cooking oil to the grates after heavy cleanings to keep rust from forming between cooks.
Summary & Next Steps
Seasoning a new pellet grill or smoker takes less than an hour, but it sets your cooker up for long term success:
- Wipe interior parts with warm water to remove factory dust.
- Apply a thin layer of high heat oil to grates and raw metal walls.
- Run a high heat burn off for 45 minutes to cure the oil and vaporize factory chemicals.
Once your smoker cools down from its initial burn off, your grates are protected, your chamber is clean, and you are ready to start smoking your favorite cuts of meat!